Building a tower
Every tower starts the same: a plain base tower for 50 gold that does 5 damage at 2.5 range, 0.8 shots a second, and belongs to no school. It is deliberately poor. Two free, permanent choices turn it into something:
Neither choice can be changed. Selling refunds half of everything you put into the tower, so a mistake costs you 50% rather than 100%.
The ten slots
Three slots are the same on all 36 paths: Damage, Attack Speed and Range. The other seven belong to the path and are listed on its Towers entry.
Each slot is levelled on its own and its cost multiplies per level — around ×1.45 to ×1.7, depending on the slot. Some cap out; the ones that do not are limited by that curve instead, which is why pouring gold into one tower gets expensive fast and why Megalith is reachable at all.
Waves
A wave sends 10 enemies, plus one more for every two waves you have cleared. Every tenth wave is a milestone: 1.6× the enemy count, and the map's usual school bias is dropped so all twelve are equally likely — the wave your specialised defence is least ready for.
Enemy health multiplies by 1.09 per wave. From wave 25 a second ramp of 1.16 per wave stacks on top, which is where most runs end. Speed rises by 1.015 a wave, capped at 1.8×. Gold per kill rises by 1.06 a wave, so income grows far slower than the wall you are shooting at.
Enemies also gain traits as the waves climb — armour at 10, speed at 15, stealth at 20, regeneration at 25, healers at 30, magic shields at 35, and splitting on death at 40 — and from wave 50 every single enemy carries one to three of them. All seven are in the Bestiary.
Wave 20 is a hard checkpoint. Stealthed enemies cannot be targeted by anything, and Radiance is the only school that can see them. One Radiance tower on the path is enough: it can target a stealthed enemy when nothing else can, and its first hit clears that enemy’s stealth for good, so every other tower can then shoot it too. It reveals the enemy it hit, not the rest of the wave.
How towers choose what to shoot
A tower always fires at the enemy furthest along the path that is inside its range — never the closest, and never the weakest. Placement near the goal therefore means shooting at whatever is about to score, and placement near the spawn means first crack at a full wave.
Synergy, precisely
Two rules that sound like one and are not:
- Combos need two different schools to damage the same enemy within 1.5 seconds. The towers can be anywhere on the board. Only a tower’s own shot counts, and the splash from it — damage-over-time ticks do not register as a hit for this purpose, so two damage-over-time paths burning the same enemy will never set their pair off by burning alone. One of them has to land a shot. Each pair then goes on its own cooldown for that enemy — 5 to 15 seconds depending on the pair — and, on top of that, no enemy can take more than one combo of any kind per 1.5 seconds.
- Adjacency needs two different schools orthogonally next to each other — up, down, left or right, never diagonal. It is a permanent stat bonus, it does not care what either tower shoots, and an interior tower can collect it from as many as four neighbours.
The adjacency figures on the Synergies pages are the values that reach play. The game stores a larger number and applies 40% of it, and halves the strength of damage-type combo effects as well — both are balance dampers added after the tables were written.
Co-op
Up to six players share one board, one shared purse and one shared pool of lives over Steam. Every extra player raises your side of the ledger, not the enemies’: the shared base health starts 30% higher per extra player, gold earned is multiplied by 1.15 per extra player, and the starting purse gains 90 gold each. Base health and the starting purse are fixed when the game is created, from the player count at that moment.
One player hosts and runs the simulation; the others mirror it, and a late joiner is caught up by a full state keyframe within about a second. That is also why wave and player-count achievements are earned by everyone, while the ones that need the full engine state — Untouchable, One True Path, Minimalist, Blitz and World Tour — are awarded to the host only.
Controls
This is the game's own reference screen, key for key.
Camera & view
WASD pan the camera
←↑↓→ keyboard grid cursor & act
+− zoom in / out
Wheel — zoom toward cursor
Middle drag — pan the map
Build & upgrade
1…90QW pick school
ABC pick upgrade path
Shift+0…9 upgrade slot on selected tower
Left click tile — open build picker
Left click tower — select & open upgrade panel
Right click — deselect / close picker
S sell selected tower
Combat
Space start next wave
F fast forward (4×)
P pause
Enter confirm build picker
UI & multiplayer
F1 / H toggle in-game help overlay
Esc (solo) — back / cancel / quit to menu
Esc (co-op) — open leave-match confirm
Shift+Q leave match without confirm (co-op)
Top-right icons — pause / fast-forward / help
Controller
The game is fully playable on a pad alone. A translates to Enter, B to Esc, X to S, Y to Space, LB to F, RB to left-click, Back to F1, Start to P.
The d-pad and left stick act as the arrow keys; the right stick moves the mouse cursor. Text fields open an on-screen keyboard.
On-screen prompts switch to pad glyphs the instant you touch a controller, and back when you touch the keyboard.
Reading the HUD
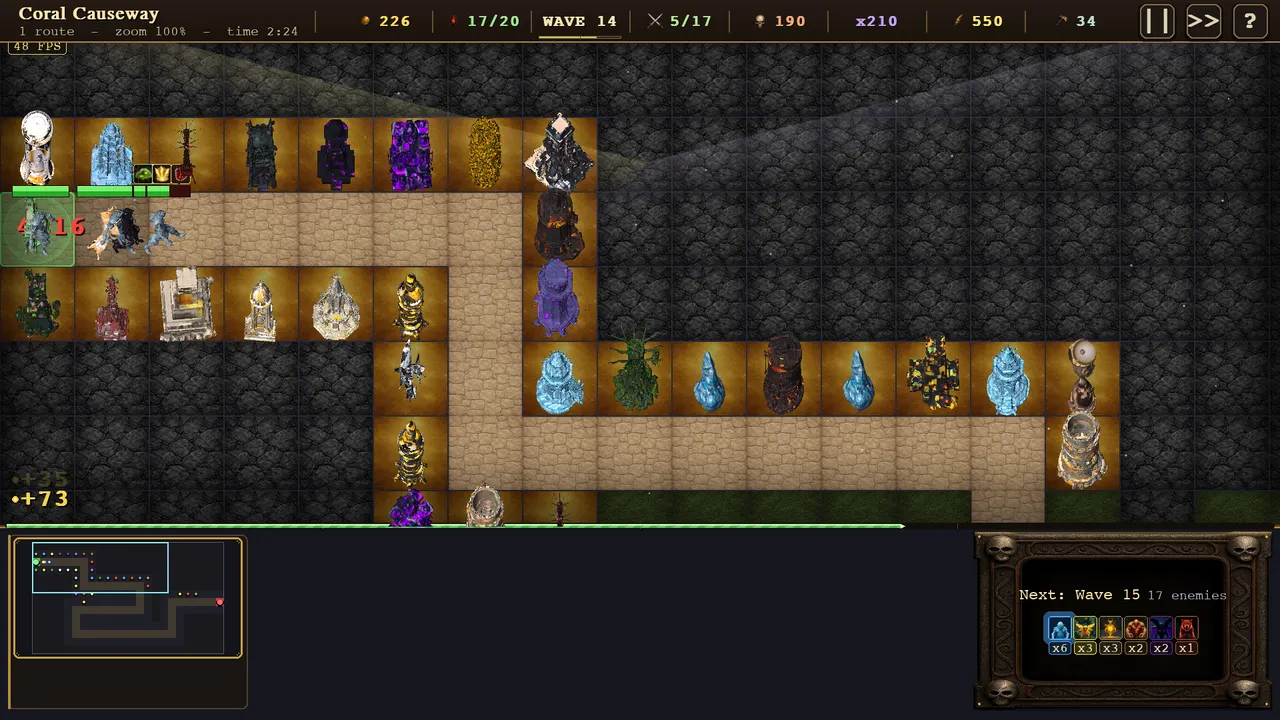
The top strip, left to right: the map name with its route count, zoom and clock; then  gold,
gold,  lives remaining out of the pool you started with, the wave number with its progress bar,
  kills this wave out of the wave's total,
  kills this run,
  synergy combos triggered,
  damage per second, and
  towers standing. Pause, fast-forward and help sit at the far right.
The bottom-left panel is the minimap and the start-wave button. The bottom-right panel previews the next wave: its number, how many enemies, and one icon per school with the count arriving — which is the cue to check whether anything you own counters them.